UnBitlockered - 0 to SYSTEM
When it comes to device encryption most companies rely on Bitlocker which in turn relies on the TPM to secure and encrypt your data on disk. Most EDR and XDR-Solutions also rely on Bitlocker and TPM and do nothing but just managing the keys or encryption-state for you. In short, most companies are using Bitlocker to encrypt their drives. Either directly or indirect via EDR.
TPM
How does Bitlocker work? Bitlocker will use the onboard-TPM-chip and encrypt the drive. The keys are saved in the TPM-Chip which is meant to be secure and therefore safely store the encryption keys. At boot-time TPM will then be used to be able to read the encrypted data. This way the user does not have to deal with handling keys because TPM is taking care of it. It is possible to run Bitlocker and prompt the user for another PIN on startup but in reality most companies are going with unattended boot (no pin or password).
Downside?
So far so good but the issue is, if you are using TPM to store your key and do not enter another PIN (or password), this in return means that at some point (at boot) TPM will need to send the key around to actually be able to read the data. This is where an attack vector opens up. TPM has been designed with security in mind. Consider it "100% secure" for now but the other chips on-board are "normal" chips and did not get this luxury treatment. So how does that help an attacker.
In short, the flash chip that is attached to the TPM can be read while booting the device, therefore circumventing the whole concept and giving out the key.

Setup
For this example I used the following:
- Lenovo X270 with Windows 10 Pro 22H2 and Bitlocker enabled
- Saleae Logic Pro 8
- Sophos Intercept X (just for fun)
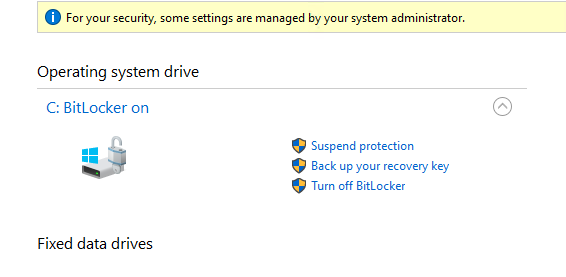
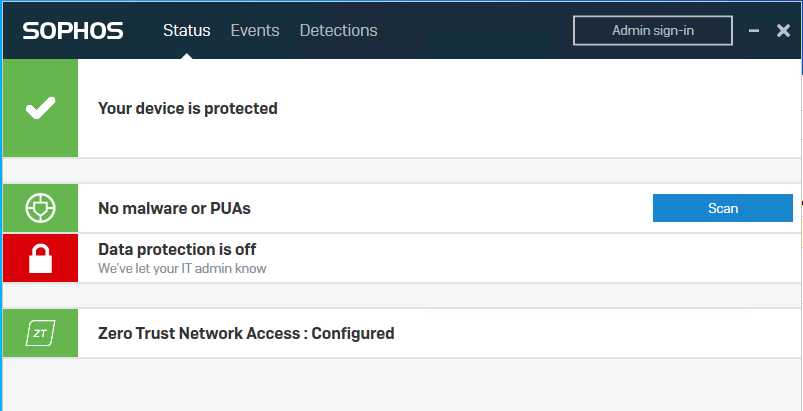
With Sophos and Bitlocker installed this would be a pretty tough target to get around and, if this would be a RedTeam-Engagement, would cost you a lot of time. But with Bitlocker disabled, we can simply avoid anything thats on disk, make a copy, extract hashes or manipulate stuff on disk.
Tell me your secrets
With the plan in mind it was time to get working. We already know that we need to find a chip that is "in contact" with the TPM, therefore allowing us to read data going through. First part is to dissasemble the whole notebook and open up the back.
Next you will need to find the part number for your TPM for your specific board. I used the following site to download Logic Schematics for my X270 and searched for the TPM-chip.
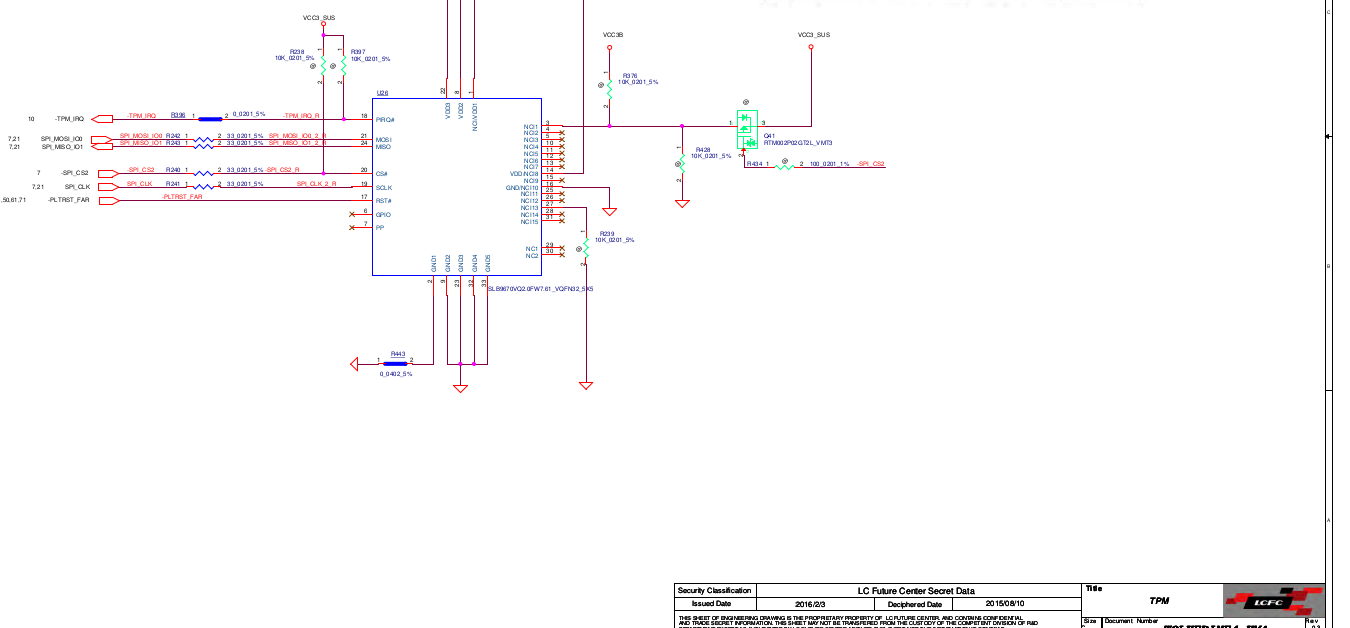
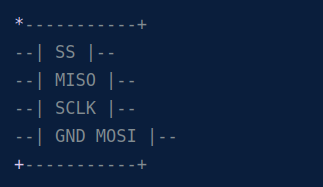
Looking closer we can see that the TPM is in fact talking to the SPI directly. This means that if we read data from SPI, we should be able to see the Bitlocker-Key going through.
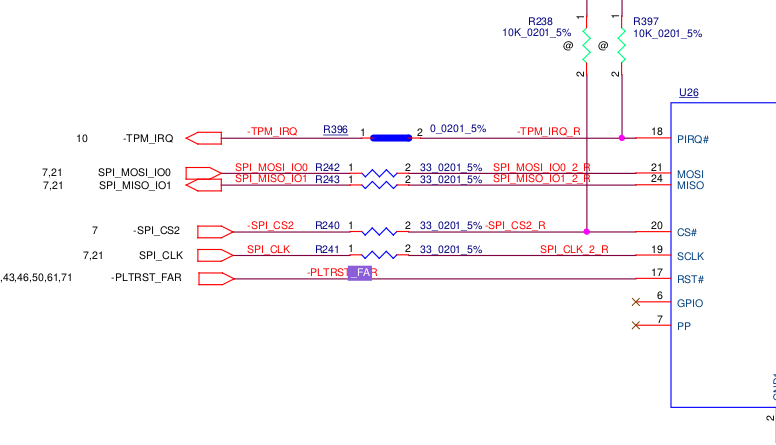
Only problem so far, where is the TPM on the board and how does the TPM look like? Good question and to find out you will need to find the mainboard of your notebook and then open up the schemata to find the TPM. To do that you can use the tool Boardviewer and the schemata for your specific board (.cad)
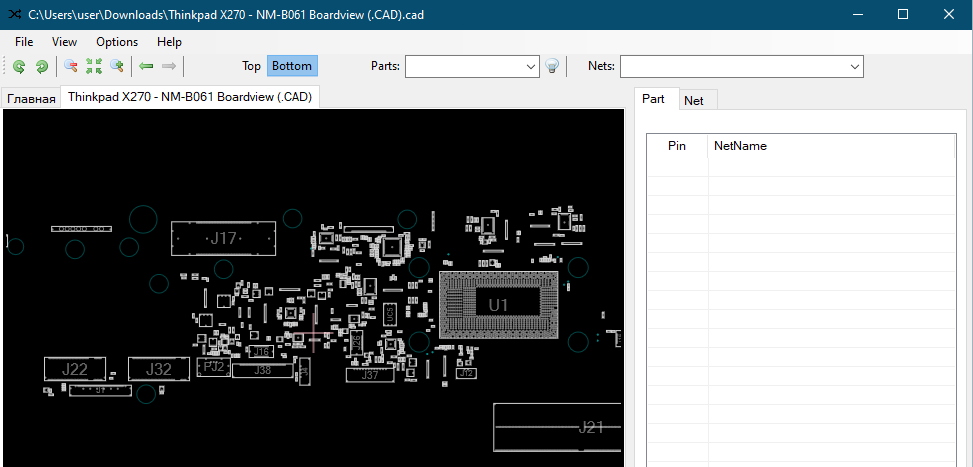
What we are looking for is a pretty big chip close to the CPU. Looking at the board I see only a few possible options. (Don't mind my awesome drawing skills ;)

With the schemata in hand we can go through each single chip and check it against the Logic schemata. If it matches, you found your TPM.
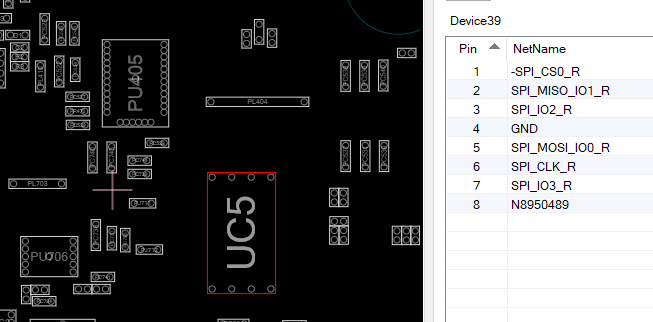
After going through the chips it turned out that PU405 is the TPM in this case.
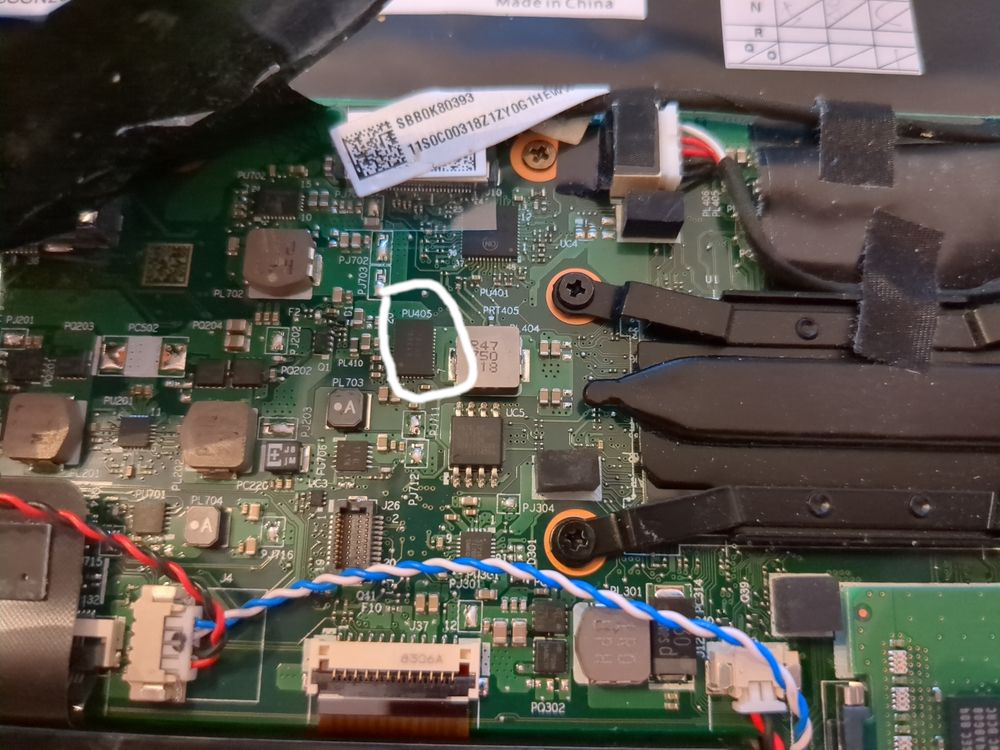
Problem, this chip is way too small to attach anything to it. We will need the SPI I was talking about before. Looking at the board the only chip that should fit the description for the SPI-Flash is the chip UC5
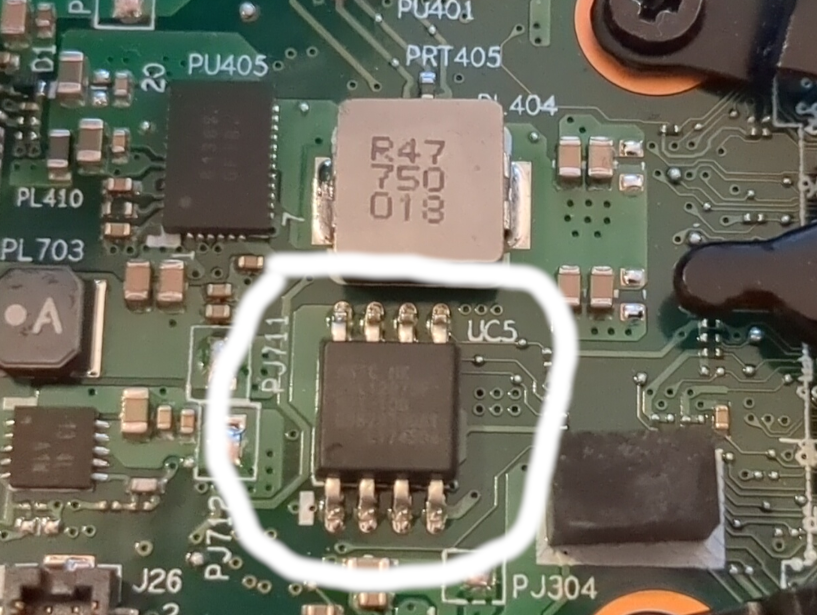
Going back to the boardviewer confirms that this is the SPI-Flash we are looking for.
Connecting things
Now we know which chips we need but not what to connect to where.
For the next part I followed the guide from WinSecureLabs/Bitlocker-spi-toolkit and connected the analyzer the following way:
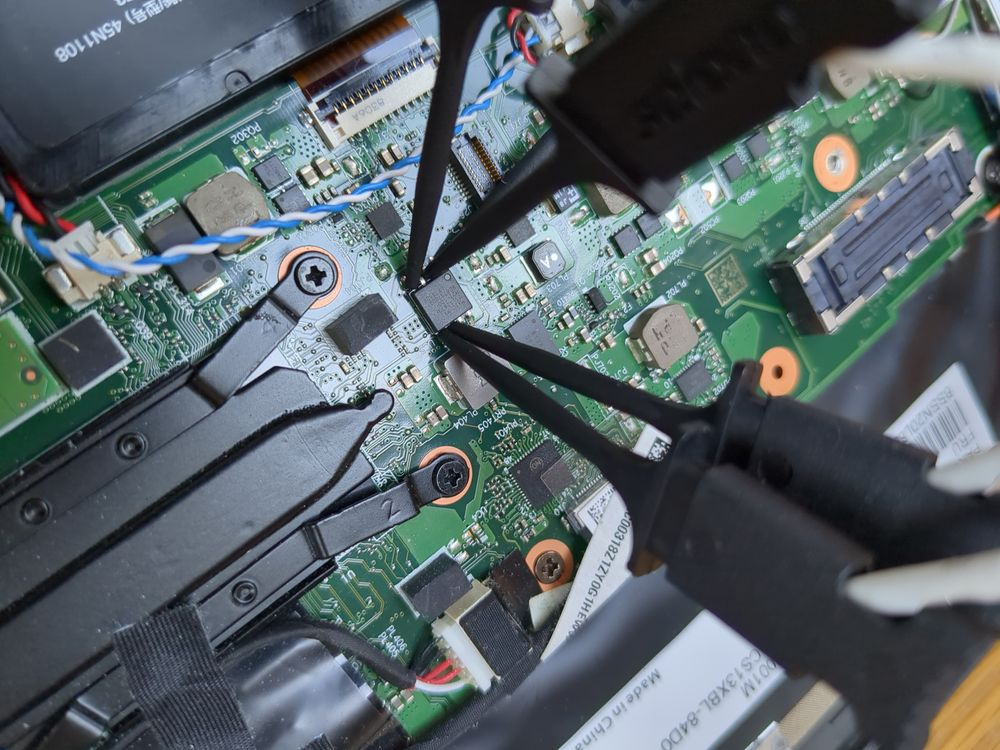
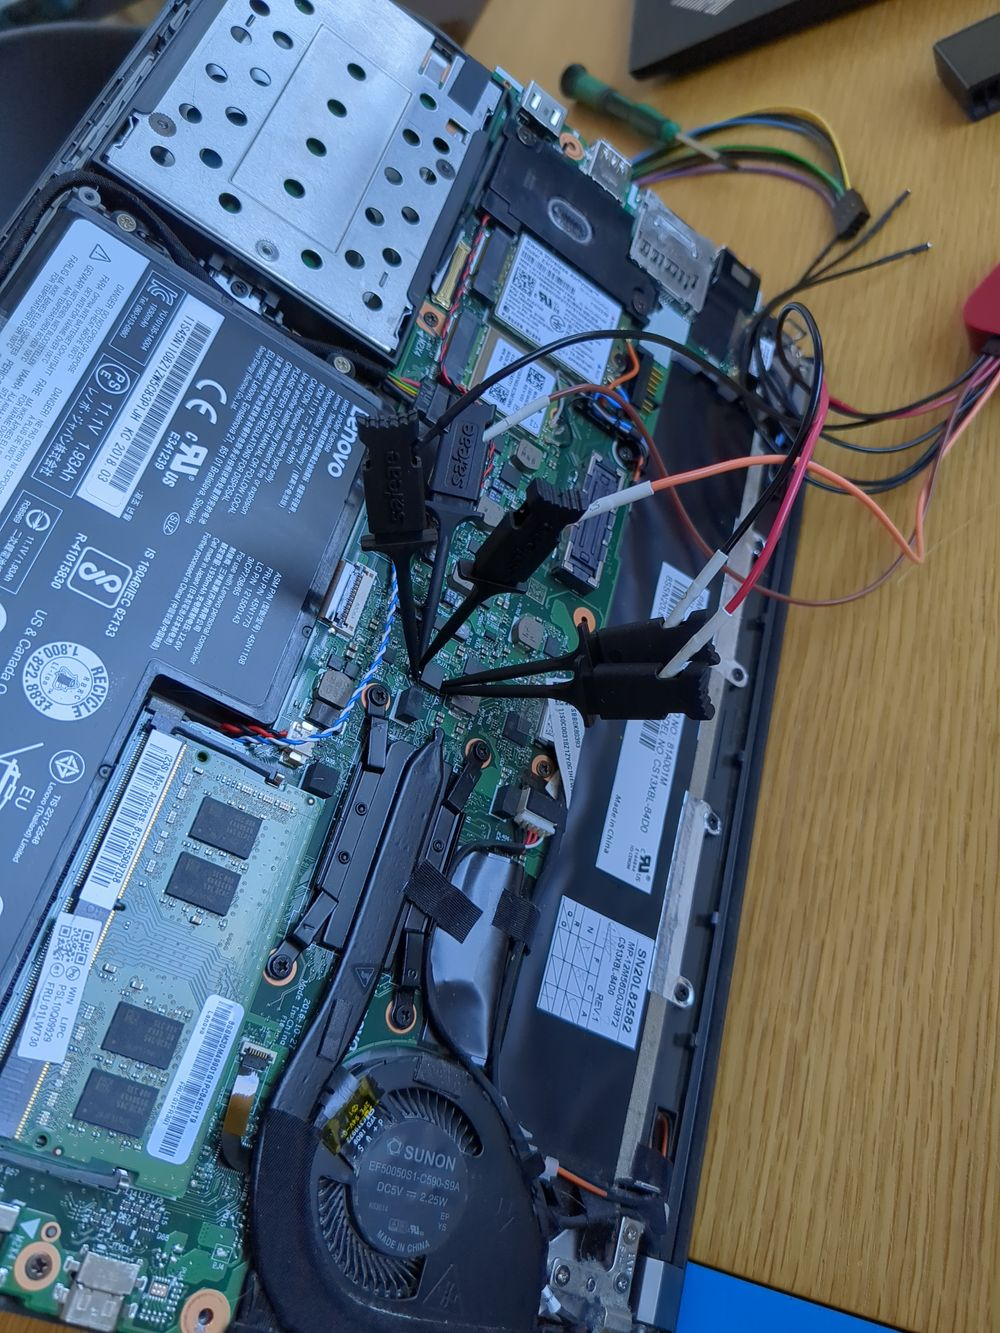
Next up, open Logic 2 and then install the TPM-SPI-Extension and the Bitlocker-Key-Extraction-Extension from the WithSecure-Repo.
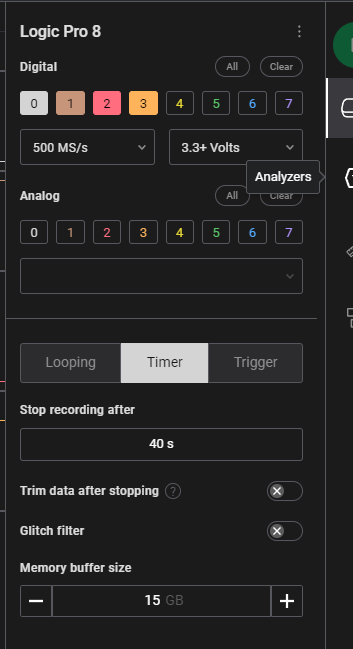
Then set up Logic 2 the following way:
- Disable all analog channels
- Enable channel 0-3 with 500MS/s and 3.3+V
- Timer, stop recording after 40s (depends on your notebook)
- Memory buffer size 15GB
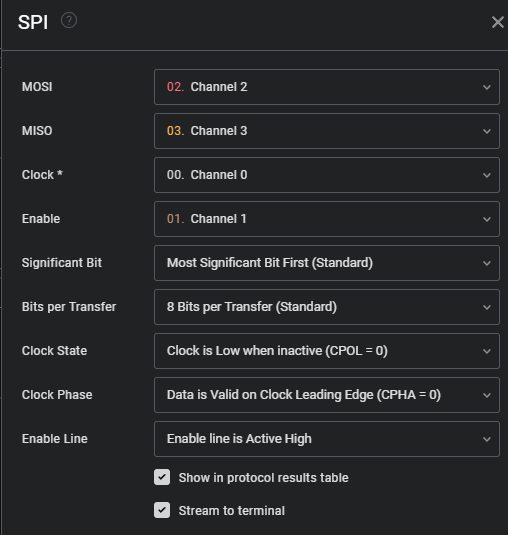
Afterwards enable the SPI-Extension and set it up the following way:
Start talking
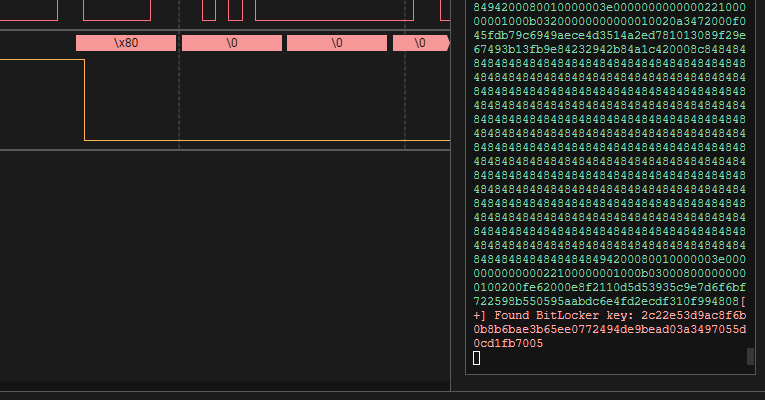
If you are done with that, hit capture and turn on your Bitlocked client right away. After 40s recording should stop and you can save the capture for later on. Both plugins will take some time to sift through all the data but after some time you should see your key in the Data output.
Unlocked
With the key in hand we can now mount the drive and read data from it or modify it directly. If all you need is data I would recommend to do any modifications on a copy of the disk instead of modifying it directly.
In this case I used the Bitlocker-client and booted into a basic Ubuntu-live-cd to grab both SYSTEM and SAM directly. This only works if your client allows you to boot from another device obviously. If not you will need to make a copy of the drive itself.
When booted up first you'll need to create the VMK-file and mount the encrypted hard drive.
#key.txt contains the captured key

# 0. install dislocker
apt install dislocker -y

# 1. create vmk
cat key.txt | xxd -r -p > vmk

# 2. create mountpoints
mkdir /mnt/ssd
mkdir /mnt/mounted

# 3. mount encrypted drive
dislocker-fuse -K vmk /dev/nvme0n1p3 -- /mnt/ssd

# 4. mount unlocked partition
ntfs-3g /mnt/ssd/dislocker-file /mnt/mounted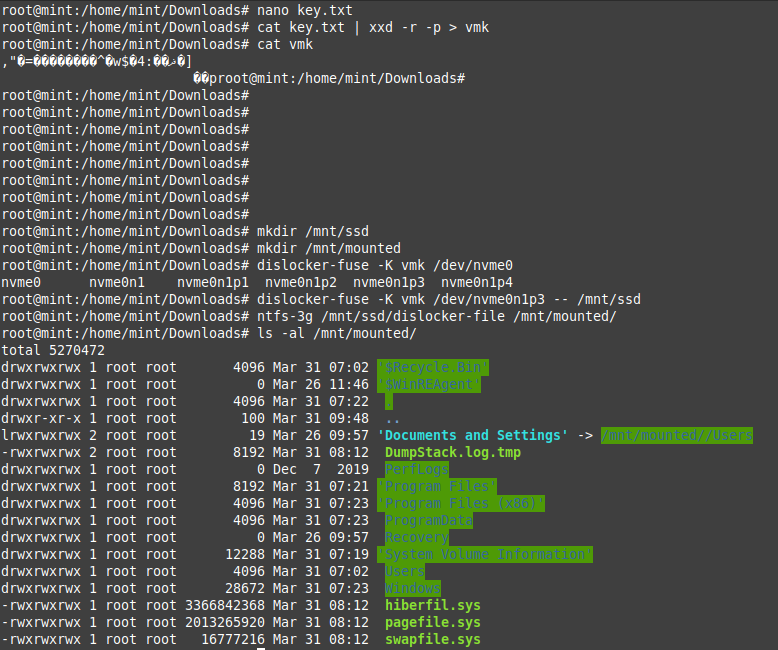
Boom! :) There it is. Unlocked Windows 10 Pro with Sophos installed and ready to be modified. If all you need is the local hashes then copy the files C:\Windows\System32\config\SAM and SYSTEM and use mimikatz to get your hashes.

Recap
Wow, this was easier than I thought and pretty scary if you think about how much effort really is required to decrypt a bitlocker-locked drive. Not much really....
How can you protect yourself against those attacks? Only with a preboot PIN or PASSWORD but lets be real no "normal" user wants to deal with those...